This post may contain affiliate links. Please read our disclosure policy.
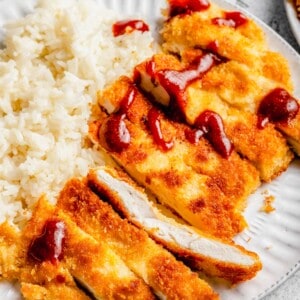
Chicken katsu is juicy, crispy, and comforting. It only takes 25 minutes and 7 ingredients to make this easy chicken dinner that just might be better than what your local Japanese restaurant sells.

Chicken katsu is so simple, but the simplicity is what makes it perfect. This recipe doesn’t have any intense herbs or spices. It’s moist and tender chicken with a crunchy crust! Top it with some tonkatsu sauce and serve it next to rice, and you’ve got yourself a perfect plate.
This is a go-to meal for me on weeknights because it only takes 25 minutes and it uses basic ingredients. If I have the chicken, then I know I have all of the ingredients necessary to make this dish. It’s also versatile, as you can eat it in many different ways. Turn it into katsu curry, make it into a sandwich, or serve it on top of an Asian salad!
Why You’ll Love This Chicken Katsu Recipe
Who doesn’t love some fried chicken? I know I do! Here’s why I think you’ll love this particular variation, too:
- Perfectly Crispy. Tender, juicy chicken with a crispy, crunchy exterior is the BEST kind of comfort food. Every bite of this fried chicken is delightful!
- Quick and Easy. You can have this chicken dinner (that everybody will devour) on the table in under 30 minutes, which is ideal on busy weeknights.
- Simple Ingredients. There’s nothing crazy happening here flavor-wise, just simple salt and pepper seasoning. It tastes great as-is, especially if you add some tonkatsu sauce on top, but definitely feel free to experiment with other seasonings, too (suggestions below).
If you’re in the mood to make more classic chicken takeout recipes, give this Chinese sweet and sour chicken a try, too!
What is Chicken Katsu?
Katsu is a very popular food in Japan. The definition is very simple: it’s just meat that’s been coated in breadcrumbs and fried. It’s usually made with chicken or pork, and often served in sandwich form. I highly recommend trying this pork katsu if you end up loving chicken katsu!

Recipe Ingredients
Here are the ingredients needed to make this juicy and crispy chicken katsu. Check out the recipe card at the bottom of the article for the exact quantities of each ingredient.
- Chicken – You want to use boneless, skinless chicken breasts for this recipe.
- All-purpose flour – This helps to seal the skin of the chicken, keeping it nice and moist as it fries.
- Kosher salt – Table salt will also work in a pinch, but kosher salt is great because it enhances the flavors of the other ingredients instead of just adding saltiness to the dish.
- Black pepper – Freshly-ground black pepper is preferable.
- Eggs – To bind the breadcrumbs to the chicken.
- Panko breadcrumbs – Other substitutions are possible (see below) but I like to use panko for the crispiest results.
- Vegetable oil – You can use any neutral oil that has a high smoke point.
What are Panko Breadcrumbs?
Panko breadcrumbs are a Japanese style of breadcrumbs. They’re made using a specific kind of white bread, with the crusts removed. Panko breadcrumbs are much lighter than the breadcrumbs that are usually used in European and American cooking, and they absorb less oil. As a result, they’re able to create an exceptionally crispy, yet still light crust.
How to Make Chicken Katsu
Ready to cook some of the best panko chicken you’ve ever tasted? Here’s how to make this 25-minute tender chicken katsu.
- Pound the chicken. Place your chicken breasts in a plastic bag and, using the flat end of a meat tenderizer (or a rolling pin if you don’t have a meat tenderizer), pound the chicken. Keep pounding until the chicken is much thinner.
- Make the flour mixture. Add flour, salt, and pepper to a bowl, and stir to combine.
- Prepare the eggs. Crack the eggs into a dish, and beat until well mixed.
- Get your breadcrumbs. Pour the panko breadcrumbs into a dish. Line up your dishes so that the eggs are in between the breadcrumbs and the flour mixture.
- Heat the oil. Pour a thin layer of oil into a skillet, and heat on medium high.
- Prepare a piece of chicken. Take a piece of chicken and coat it in the flour mixture, then cover it in the beaten eggs. Add it to the breadcrumb mixture, and shake off any excess breadcrumbs.
- Fry. Add the chicken to the pan, and cook it on each side until it’s brown but not burnt, which should take about 3-4 minutes. After the chicken is finished cooking, scoop out any excess breadcrumbs from the skillet, then repeat the process until all of the chicken is cooked.

Tips for Success
Pretty simple, right? Here are a few more tricks for making the best chicken katsu:
- Use the two hand technique. Frying foods can become a sticky, messy hassle. To keep this from happening, use the two hand technique for dredging the chicken. Use one hand to coat the chicken in flour and transfer it to the eggs. Use your other hand to coat the chicken in eggs, and transfer it to the panko. Then, use your first hand again to remove the chicken from the breadcrumbs. That way one hand stays dry, one hand stays wet, and you avoid making a gummy mess.
- Pound to an even size. When pounding the chicken, make sure that it has a uniform thickness throughout. That way, all of the chicken will cook at the same speed, and you won’t have overcooked bits.
- Check your oil. It’s very important to use oil that’s at the right temperature. If your oil is too hot, the breadcrumbs will burn. If it’s too cold, the chicken won’t fry properly, and will be soggy and greasy but not crisp. Before frying, put a drop of water in the pan. If it sizzles in the oil, then it’s hot enough. If it doesn’t sizzle, let the oil keep heating. If the oil is smoking, add a little bit more oil to bring down the temperature. Repeat this process between each piece of chicken that you fry.
- Work in batches. You want to fry the chicken in batches to keep the oil hot. If you add lots of chicken at once, it will drop the level of oil in the pan so much that the chicken won’t fry. If this happens, the breadcrumbs will absorb the oil instead of frying in it, and the chicken will be greasy and soggy.

Substitutions & Recipe Variations
Let’s briefly discuss a couple of variations and substitutions that you could make in this Japanese fried chicken.
- Breadcrumbs. Like I mentioned above, panko breadcrumbs are my go-to for crispy but light results. That said, you can still use regular breadcrumbs if you want, but they will absorb more oil and your chicken katsu will be a little greasier.
- Chicken. If you’d like to make this recipe with chicken thighs or even chicken tenders, go ahead! Adjust the cooking time accordingly.
- Seasoning. I usually stick with salt and pepper, but you can add extra savory seasoning with garlic powder, onion powder, etc.

What Goes With Japanese Fried Chicken?
Wondering what to serve with your chicken katsu? Other than a healthy dose of tonkatsu sauce, here’s what I like to add on the side:
- Rice. Steamed white rice is a simple, traditional side dish for this meal that you can make while frying the chicken, if you like!
- Lemon Wedges. Lemon juice adds some nice tanginess to the chicken that enhances the other flavors.
- Miso Soup. A salty-sweet bowl of miso soup pairs really nicely with this chicken dinner.
- Vegetables. Keep it simple with steamed broccoli or shredded cabbage!
How to Store and Reheat Leftovers
If you end up having leftovers, here’s how to properly store and reheat this chicken katsu recipe:
- To Store. Keep this chicken katsu in an airtight container in the fridge for up to 3 days.
- To Reheat. You can reheat in a toaster oven, or in a 375F oven for about 6-7 minutes. You can also reheat the katsu in the microwave, but it will lose its crunch.
Can This Recipe Be Frozen?
Yes, you can freeze this chicken katsu in an airtight container for up to 3 months. Remember to thaw it in the fridge before reheating.
More Tasty Chicken Recipes to Make
Here are some of my other favorite chicken recipes for you to try.
- Chinese salt and pepper chicken wings
- Grilled teriyaki chicken skewers
- Sweet chili glazed grilled chicken
- Baked chicken spaghetti
- Greek chicken pasta salad
Chicken Katsu [チキンカツ]
Ingredients
- 1 pound (454 g) boneless skinless chicken breasts, or thin sliced boneless skinless chicken breasts
- ½ cup (63 g) all purpose flour
- Couple pinches of kosher salt
- Ground black pepper
- 2 eggs
- ⅔ cup (40 g) Panko breadcrumbs
- Vegetable oil
Instructions
- In a plastic bag, pound your chicken breasts to a thin filet, one at a time, with the flat end of a meat tenderizer. If you're using thin sliced, you may not have to do this step as it's already thin enough. Make sure to have padding underneath your plastic bag so you don't break your countertops!
- In a shallow dish, add in flour, salt, and pepper. Mix around.
- In another shallow dish, beat 2 eggs.
- In yet another shallow dish, put your panko in.
- Assemble the shallow dishes in the following order: flour, eggs, panko.
- In a skillet, turn the heat on medium high and add a thin layer of vegetable oil to the pan, just enough to coat the bottom of the pan.
- Take one of your chicken filets, dredge it in flour on both sides, then egg, then cover it in panko and shake off any excess.
- Test the oil to see if it's hot by flicking some water in it. If it sizzles, you're good.
- With tongs, put your breaded chicken in and cook on each side for about 3-4 minutes or until it's brown (don't burn it).
- It shouldn't take long for the chicken to cook all the way through since they've been pounded out so thin.
- Before you start on another filet, I would clear out the skillet of straggling panko crumbs. Just take a spatula and scrape them out. They'll burn if you keep them in there for your other filets and your house will smell like disaster :)
- Repeat until all your chicken filets are cooked, slice into length-long pieces and serve with white rice. Don't forget to top with katsu sauce!
Notes
- To Store. Store in an airtight container in the fridge for up to 3 days.
- To Freeze. You can also store this in the freezer for 3 months.
- To Reheat. You can reheat in a toaster oven, or in a 375F oven for about 6-7 minutes. You can also reheat the katsu in the microwave, but it will lose its crunch.
Nutrition
Photography by Eat Love Eats


Amazing, I just started to live alone, and need to modify recipes for one
Cheers from Honduras
Have you made these again? I’ve always made regular pork tonkatsu with this tonkatsu sauce that I normally buy at the Asian supermarket.
http://www.amazon.com/Bull-Dog-Tonkatsu-Sauce/dp/B000W59KLI/ref=sr_1_4?ie=UTF8&qid=1341889175&sr=8-4&keywords=tonkatsu+sauce
^_^