This post may contain affiliate links. Please read our disclosure policy.
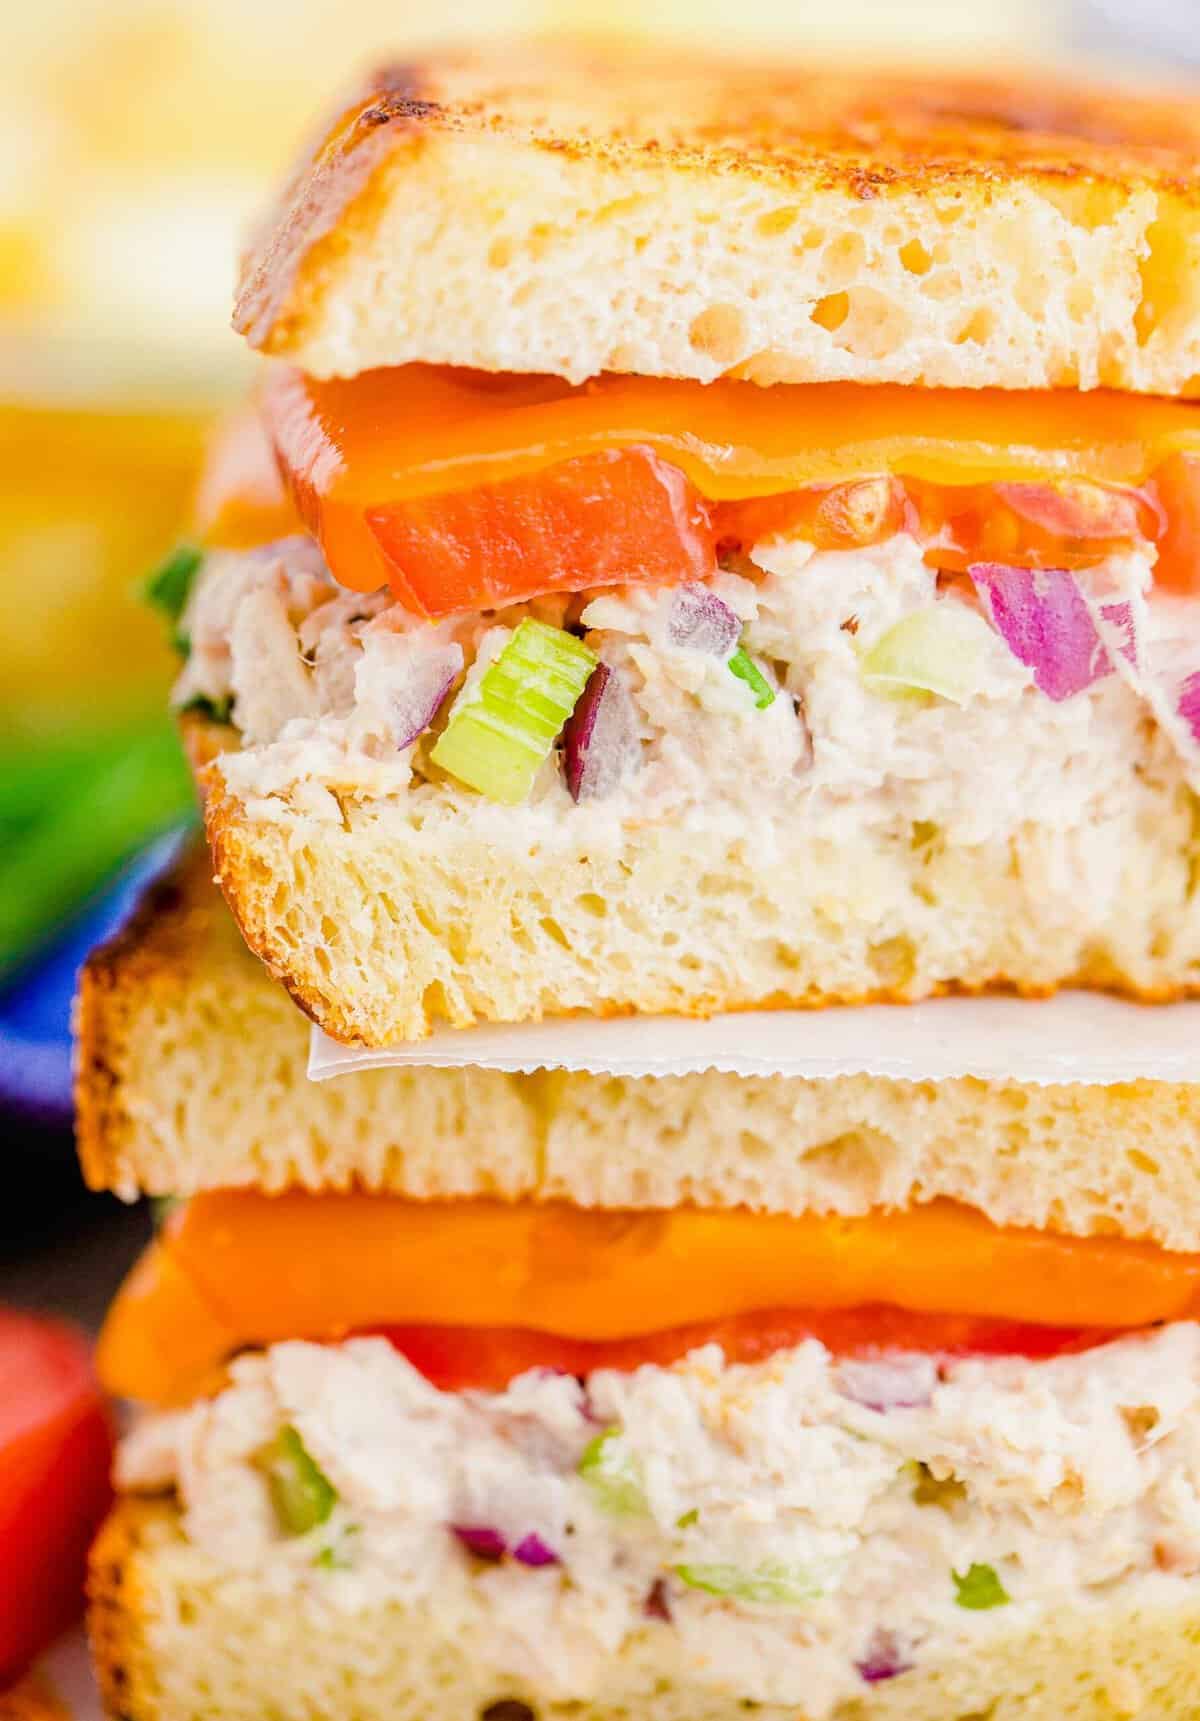
This tuna melt recipe is just like your favorite diner sandwich! Creamy tuna salad, melted cheddar, and sliced tomato on buttered, toasty white bread. It is unbelievably easy to make at home!
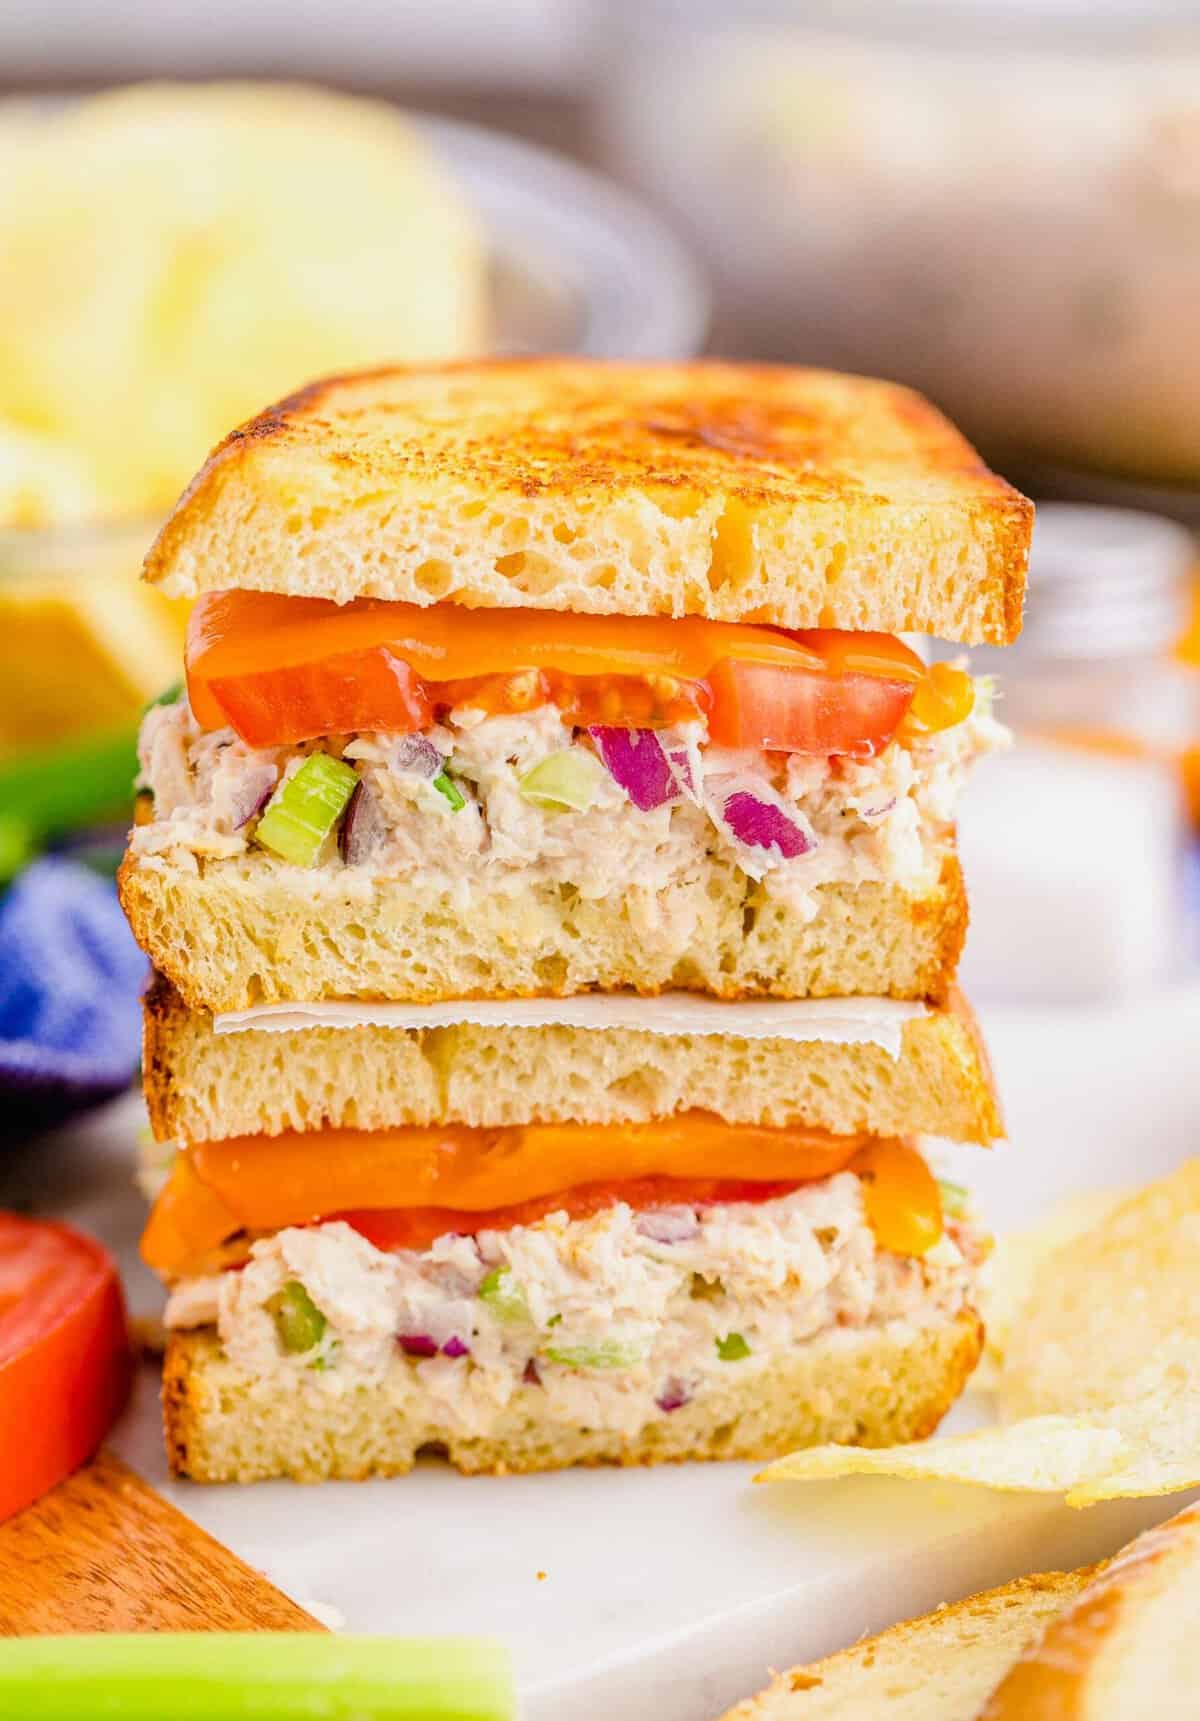
Tuna melts are a staple at diners and delis, but there’s no reason you can’t make them in your own kitchen too. Once you’ve whipped up the tuna salad, the sandwiches themselves are no more complicated than making a grilled cheese. Just layer everything onto your bread and cook until the cheese is melty and the bread is nicely browned.
Growing up, my mom would actually make tuna salad for us often, so canned tuna was never an aversion for my brother and I. I know there are definitely naysayers but I gotta say – it’s a GREAT source of lean protein and very filling. I remember I used to be so embarrassed bringing this to lunch because kids would make fun of me for the smell. Well, jokes on them now because tuna is GOOD, haha
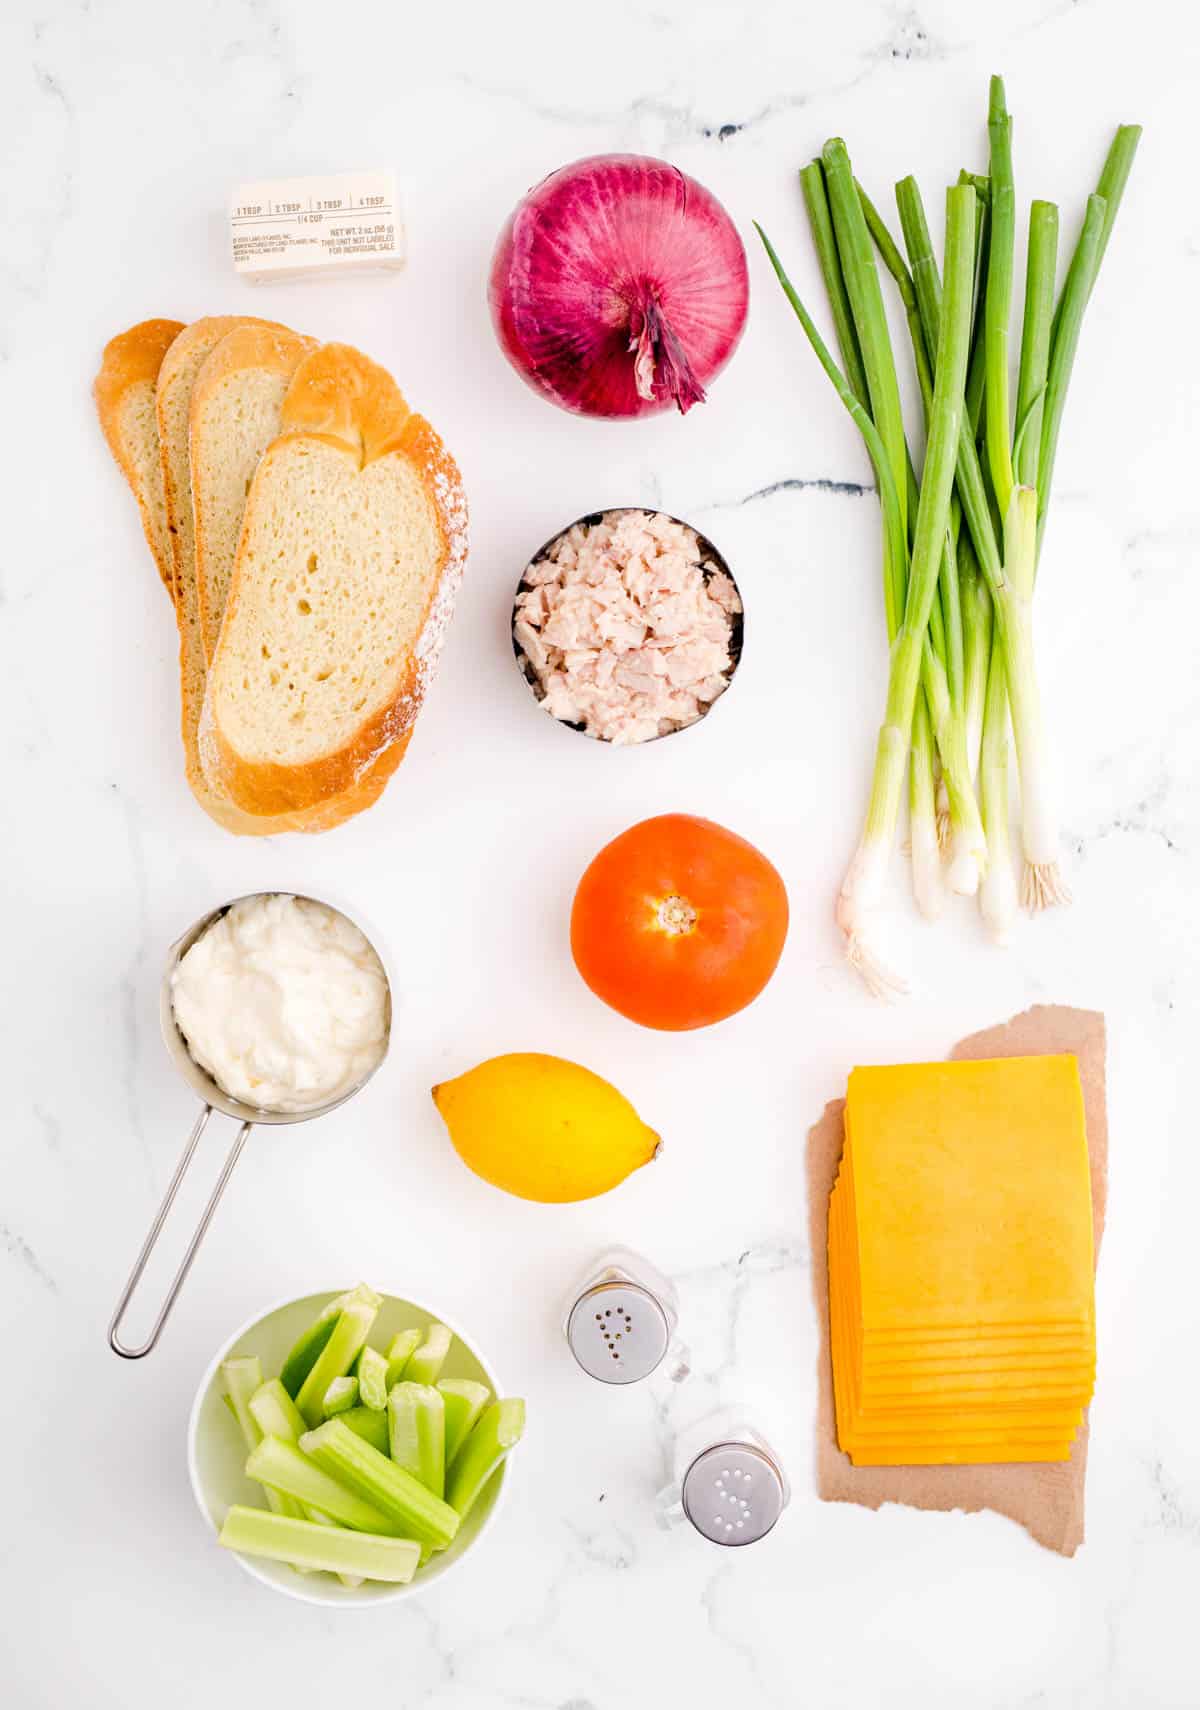
Ingredients for Tuna Melts
The beauty of a tuna melt is you can switch things up and make it your own. If you have a go-to tuna salad recipe, use it! Be sure to scroll down to the recipe card for specific amounts.
- Canned tuna – drain this well to keep your sandwiches from getting soggy!
- Mayonnaise – feel free to use your favorite kind. My favorite is Duke’s mayo and I use the full fat version for an extra creamy indulgence! Also, you may use plain Greek yogurt as a substitute if you aren’t a fan of mayo.
- Red onion – I love using red onion in tuna salads. That bite is just so good!
- Lemon juice – this adds a little bit of freshness.
- Salt and pepper
- Celery – Chopped water chestnuts or even dill pickles can be substituted for the celery, but celery is definitely the way to go for that crunch and texture!
- Green onion
- Cheddar cheese slices – use your favorite here. You can even switch it up and use white cheddar or pepper jack cheese.
- Tomato
- Bread – White bread is the traditional choice for tuna melts, but you can use whole wheat, rye, sourdough, or anything else you like. Thick Texas toast would be hearty!
- Salted butter – Let this soften up a bit to room temperature so it’s easy to spread onto the bread without tearing it.
Which Is Better, Tuna in Oil or Tuna in Water?
You can use either tuna in oil or tuna in water for this recipe; nutritionally, water-packed tuna is lower in calories, but some people prefer oil-packed because it’s softer and has a more flavor thanks to the oil.
How to Make a Tuna Melt Sandwich
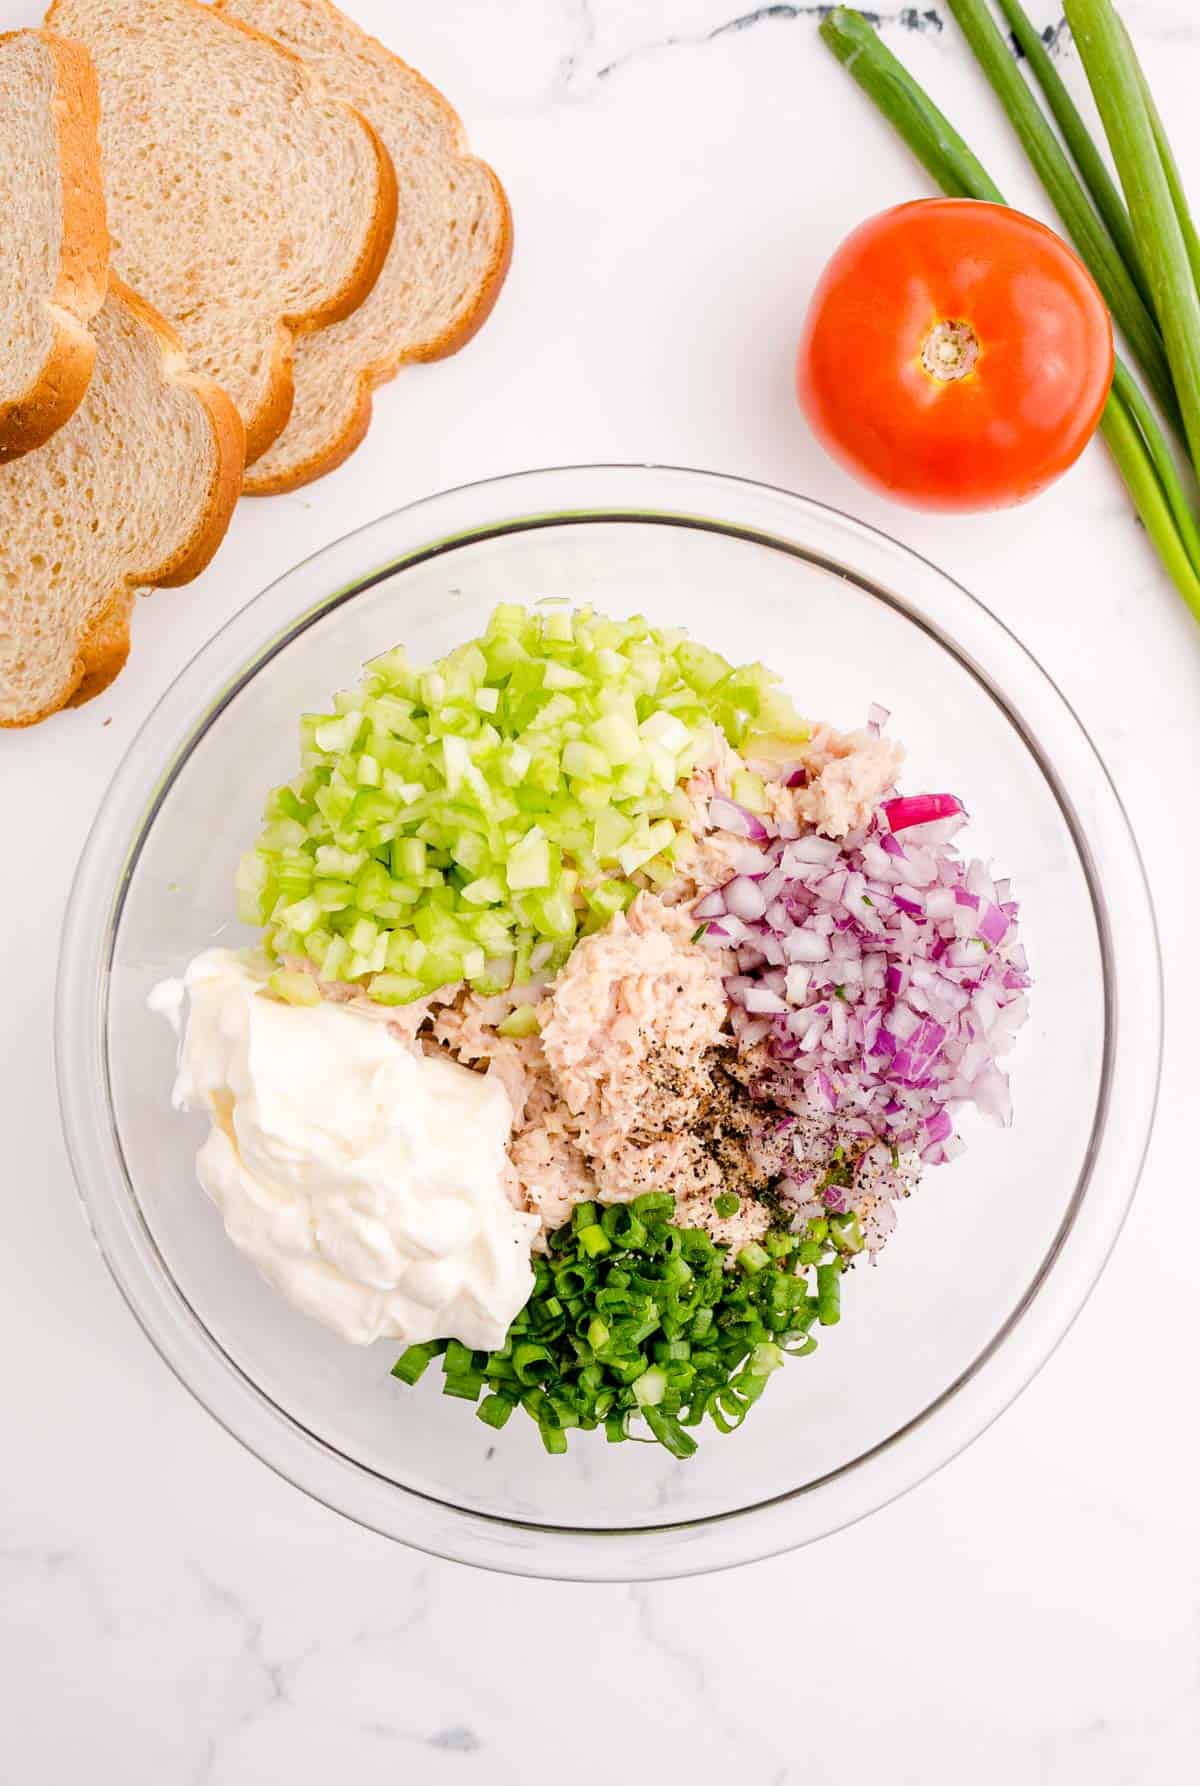
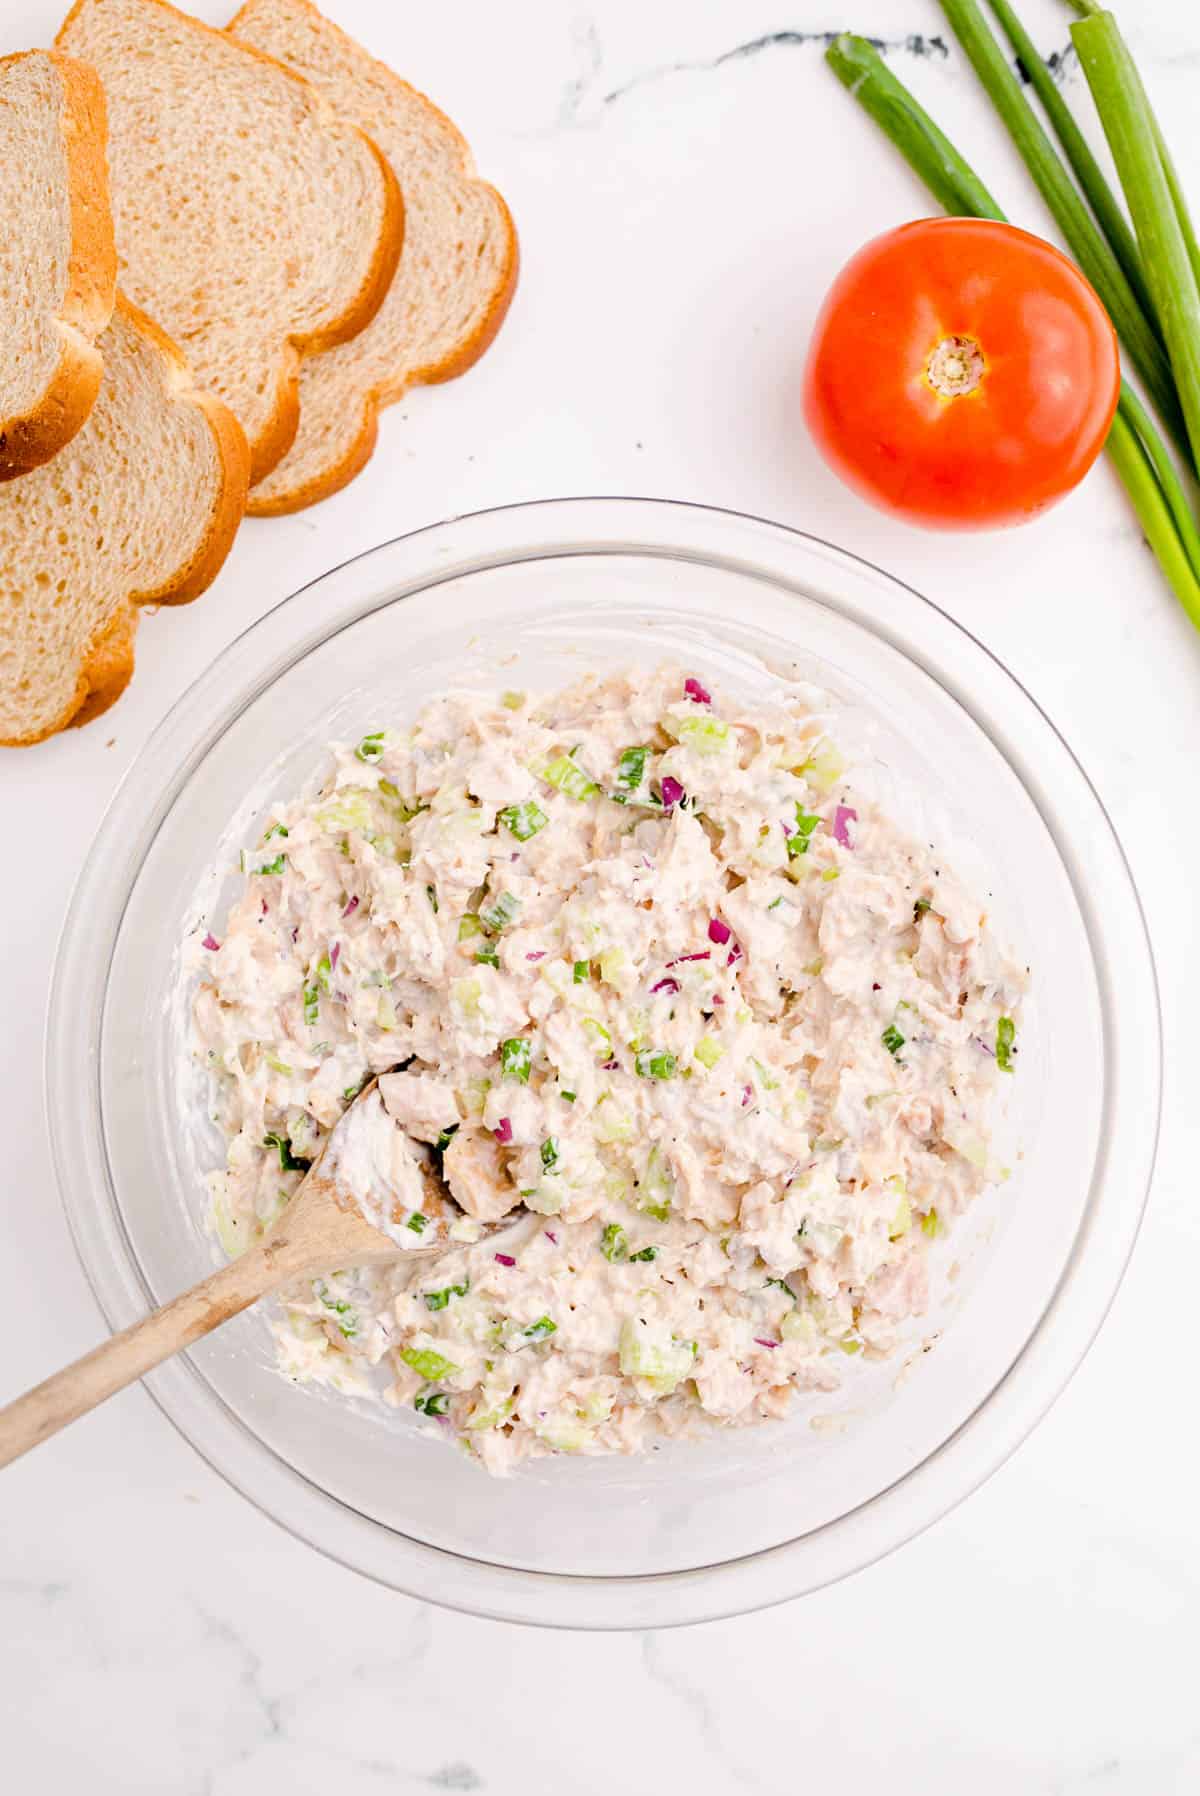
Make the tuna salad. Place the tuna in a medium bowl and break it up with a fork. Stir in the mayonnaise, onion, lemon juice, salt, pepper, celery, and green onion.
Preheat your cooking surface. Heat a skillet or griddle over medium-low heat.
Assemble. Spread the butter on one slice of bread. Place it in the skillet butter-side-down. Spread the top with about ½ cup of the tuna mixture, then layer on slices of tomato and a slice of cheese. Butter another piece of bread and place this on top, with the butter side on the outside. Repeat with remaining sandwiches.
Cook. Once the bottoms of the sandwiches are nicely browned, flip them carefully and cook the other side until it’s toasted and the cheese has melted.
Tips for Success and Variations
Here are a few hints and tips to help make sure your tuna melt turns out perfect!
- Use a sturdy bread. No matter what variety of bread you use, make sure the slices are fairly sturdy so your sandwich doesn’t fall apart when you bite into it. If you’re using white bread, you may want to use slightly thicker slices.
- Don’t turn the heat too high. If you do, your bread will burn before the tuna warms up and the cheese melts.
- Making it open-faced. To make your tuna melt an open-faced sandwich, don’t add the top slice of bread and turn the heat a little bit lower to ensure that the cheese melts before the bread gets too browned.
- Try a different filling. Okay, I know this is a recipe for tuna melt, but I like to give options! If tuna isn’t your thing, this crab melt is similar and just as tasty!
How to Store and Reheat Leftovers
If you have unused tuna salad, it can be stored in an airtight container in the refrigerator for 3 to 5 days. To store the tuna melt sandwich, keep it in the fridge for up to 2 days. Reheat it in a 350ºF oven until warmed through, or for about 5 minutes.
Serving Suggestions
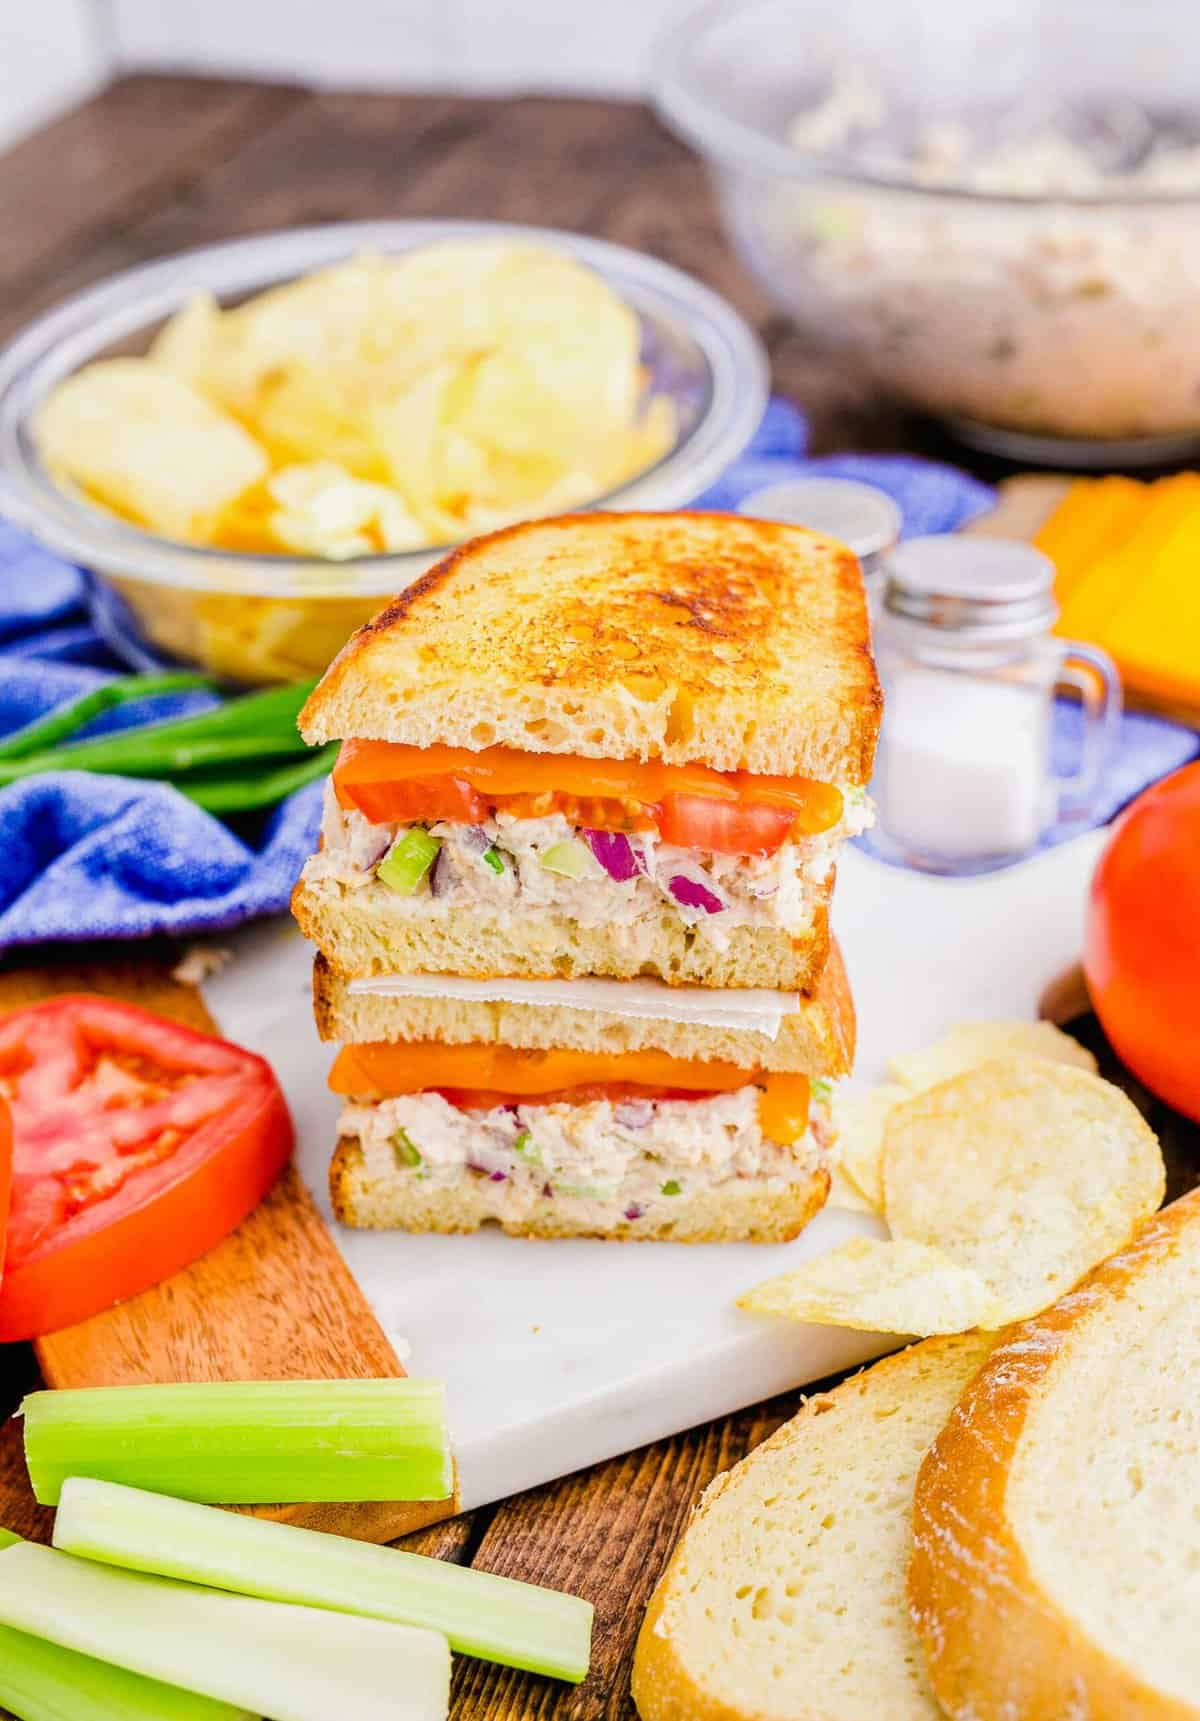
If you want to go for the full deli experience, you can serve up your homemade tuna melts with a handful of potato chips or garlic fries. You could also cut the leftover celery into sticks and pair it with Homemade Tzatziki Dip or Beet Hummus for a more virtuous side. Easy Oven-Baked Zucchini Chips or Kickin’ Tomato Soup are excellent options, too!

Tuna Melt
Equipment
Ingredients
- 10 ounces (284 g) canned tuna, drained
- ⅓ cup (75 g) mayonnaise
- ¼ cup (40 g) red onion, diced
- 1 teaspoon lemon juice
- Pinch of salt
- Pinch of pepper
- 1 rib of celery, diced
- 1 green onion, finely sliced
- 4 slices cheddar cheese
- 2 Tablespoons (28 g) salted butter, softened
- 8 slices bread
- 8 slices tomato
Instructions
- After draining the tuna thoroughly, place it into a medium bowl. Use a fork to break it up really well.10 ounces (284 g) canned tuna
- Mix mayonnaise, onion, lemon juice, salt, pepper, celery, green onion, and cheese with the tuna.⅓ cup (75 g) mayonnaise, ¼ cup (40 g) red onion, 1 teaspoon lemon juice, Pinch of salt, Pinch of pepper, 1 rib of celery, 1 green onion, 4 slices cheddar cheese
- Heat a skillet to medium-low heat.
- Spread butter on one slice of bread. Place this piece of bread, butter side down, into the skillet. Add about ½ cup of the tuna mixture and spread it to the edges of the bread. Add slices of tomato and a slice of cheese. Butter on one side of another piece of bread. Place this piece of bread (butter side up) on top of the cheese. (The butter goes on the outside of the sandwich so that it will toast nicely.) Then carefully flip the sandwich with a spatula to grill both sides.2 Tablespoons (28 g) salted butter, 8 slices bread, 8 slices tomato
- Cook the sandwich in the skillet at medium-low heat until the cheese is melted and the bread is toasted.