This post may contain affiliate links. Please read our disclosure policy.
Oh my gosh, this post may be one of the most highly requested from Instagram! For a couple months now, I have been making my own almond beverage and the difference is SO dramatic. Like, to the point where I can’t go back to store-bought unless I have to. I sounds so high-maintenance and so granola/crunchy/hippy by saying that but once you make it on your own, you will see what I mean about store-bought vs. homemade. The taste is SO much cleaner and it isn’t thick and gunky like the store-bought. The texture is completely different and you know exactly what goes into it. Almonds and water. THAT’S IT. And sometimes I add a splash of vanilla extract and/or chai seasoning for a vanilla chai almond beverage.
 beverage at home is super easy and it seriously tastes so much cleaner and better than the store-bought kind. You know exactly what goes into it — almonds and water — and you can add additional flavors if you desire! #homemadealmondmilk #almondmilk #homemade")
And YES, I call it beverage because it really isn’t ‘milk.’ We can fight all day long about this but nut ‘milk’ isn’t ‘milk.’ It doesn’t come from a cow. Farmers are actually fighting back on this and requiring nut beverage makers to change their labeling. I mean, it’s petty but I want to be phonetically correct especially if I’m putting this out on the web. I know I’m little fish in a big pond but hey — it’ll be better in the long run.
 beverage at home is super easy and it seriously tastes so much cleaner and better than the store-bought kind. You know exactly what goes into it — almonds and water — and you can add additional flavors if you desire!")
Okay so what you do is, you take 1 cup of almonds and cover them with tap water. Let them soak overnight.
 beverage at home is super easy and it seriously tastes so much cleaner and better than the store-bought kind. You know exactly what goes into it — almonds and water — and you can add additional flavors if you desire! #homemadealmondmilk #almondmilk #homemade")
They become super soft and the skins pop right off. You can peel all the skins off if you want and I only did it for my first batch.
I heard that it gives a more creamy and smooth consistency (like how if you peel the outer skin from chickpeas, your hummus is smoother), but I could literally not find a difference whatsoever from skinned and unskinned almonds. So I don’t even waste my precious 20 minutes anymore peeling the skin off my almonds. I just drain and throw into my blender.
 beverage at home is super easy and it seriously tastes so much cleaner and better than the store-bought kind. You know exactly what goes into it — almonds and water — and you can add additional flavors if you desire! #homemadealmondmilk #almondmilk #homemade")
 beverage at home is super easy and it seriously tastes so much cleaner and better than the store-bought kind. You know exactly what goes into it — almonds and water — and you can add additional flavors if you desire! #homemadealmondmilk #almondmilk #homemade")
You then put your almonds in the blender and fill with 4 cups of fresh filtered water.
 beverage at home is super easy and it seriously tastes so much cleaner and better than the store-bought kind. You know exactly what goes into it — almonds and water — and you can add additional flavors if you desire! #homemadealmondmilk #almondmilk #homemade")
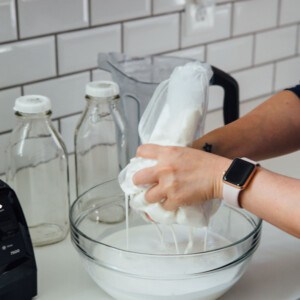
Blend blend blend until it’s all mixed up and then…the fun part. Putting it into your NUT SACK. Omg, this has cracked everyone up on Instagram and even every time I say it, I’m the immature 12 year old. You can grab one of these reusable bags on Amazon. Here’s the one I got!
 beverage at home is super easy and it seriously tastes so much cleaner and better than the store-bought kind. You know exactly what goes into it — almonds and water — and you can add additional flavors if you desire! #homemadealmondmilk #almondmilk #homemade")
And then you just carefully squeeze all the beverage out! It’s really that simple!
Unless of course you’re me and the entire thing explodes on you.

It literally looked like a baby spit up on me. LOL
 beverage at home is super easy and it seriously tastes so much cleaner and better than the store-bought kind. You know exactly what goes into it — almonds and water — and you can add additional flavors if you desire! #homemadealmondmilk #almondmilk #homemade")
Anyway! Once you’re done straining and getting alllll that liquid out, you are left with the almond pulp which you can throw away or you can make a recipe with it (no thanks). I pour the liquid back into my blender to then easily pour into these glass bottles that look oh-so-fancy sitting in my fridge!
You’ll want to try to drink this within 5-7 days of making them for the freshest taste! Since there are no preservatives in this, I would drink it ASAP! I mean, I don’t think it would actually go “bad” if it sat in the fridge for longer considering it’s just almonds and water but you never know!
Homemade Almond Beverage
Equipment
Ingredients
- 1 cup (143 g) raw almonds, not roasted or salted, RAW
- 4 cups (946 ml) filtered water
- 1 teaspoon vanilla extract, optional
Instructions
- In a small bowl, add raw almonds and cover with tap water. Soak almonds overnight.1 cup (143 g) raw almonds
- When ready, drain almonds from the water they have been soaking in and peel skin, if desired. See notes below.
- Add drained almonds to a powerful blender.
- Fill with 4 cups (946 ml) of filtered water and add vanilla extract, if using.4 cups (946 ml) filtered water, 1 teaspoon vanilla extract
- Blend until smooth.
- Pour into a nut milk sack that is inside a large bowl to accommodate at least 5 cups of liquid.
- Gently massage and squeeze out the liquid until the pulp is pretty much dry and you can get no more liquid out.
- Pour the liquid back into the blender and pour into glass bottles or whatever container you have.
- Refrigerate and use within 5-7 days.
Notes
Nutrition
There are affiliate links within this post.


If you leave the skins on, take the remaining material out of the “nut sack” and place it in a dehydrator to dry out.
Once it is dry (make sure it is dry), put it in a food processor or blender to make it a powder, then sift it.
The large particles left in the sifter can be used on cereal or whatever you like, and the finished product may be used as almond flour.
Store the almond flour in an airtight container. I use a zip-lock bag. Once I place the flour in the zip-lock bag, I close the bag most of the way and then roll the bag to force out the air. Once that is done I close the bag.
Love this site! Thank you for sharing.
You’re wasting a lot of good fibre by throwing out the almond solids. Try drying it out in the oven and using it in baked goods. It’s almost the same as the spendy ground almonds & coarse almond flour.
I was thinking, since I only use almond milk in smoothies I wonder if you could get away with not straining it at all
and just giving it a good shake before using. I do frequently use nuts in smoothies and never noticed a texture problem. I am going to give it a try, thanks for the inspiration!
Hi Julie – just out of curiosity, where do you buy your almonds?
Costco!! 5 pounds for $19.99!