This post may contain affiliate links. Please read our disclosure policy.
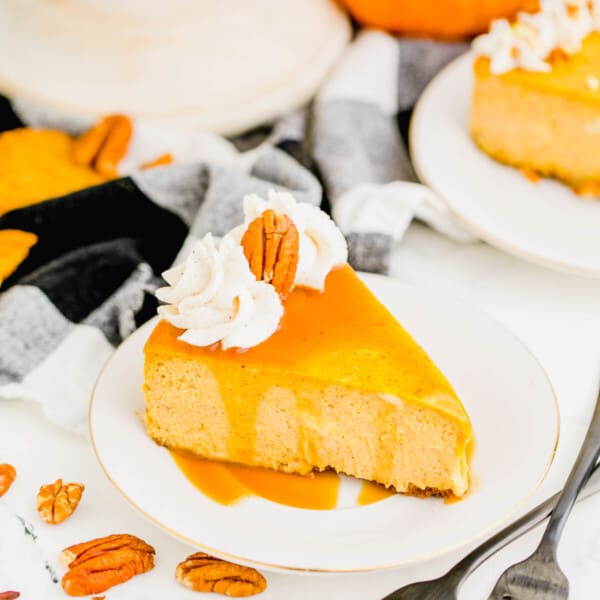
These mini pumpkin cheesecake bites have the creamiest spiced pumpkin filling baked in a buttery graham cracker crust, topped with a big dollop of whipped cream. It’s an easy dessert recipe bursting with seasonal flavors, perfect for Thanksgiving!

Mini pumpkin cheesecake bites are a perfect way to wrap up a holiday meal. After you’ve eaten your fill of turkey and focaccia fig and sausage stuffing, these bite-sized delights are just enough for a sweet finish. These pumpkin cheesecake bites are super creamy and moist and filled with fall spices. The pumpkin flavor is definitely present in this cheesecake recipe, but not overbearing. A dollop of whipped cream keeps things festive. Make them for a holiday or a party, and watch them fly off the plate!
Why You’ll Love This Mini Pumpkin Cheesecake Recipe
- Single-serving. This recipe is a mini variation of my favorite pumpkin cheesecake recipe. The smaller size makes these bites perfect for parties.
- Perfectly balanced flavors. Have you ever taken a bite of a pumpkin cheesecake to find that it tastes overwhelmingly like, well, pumpkin? Not this recipe! You get the perfect balance of moist, tangy cheesecake paired with rich, sweet pumpkin and spice.
- Extra creamy. The texture of these mini pumpkin cheesecake bites is ultra-smooth and creamy. Like living in luxury for the whole two bites before it’s finished. You’ll be finding excuses for seconds!
- Easy to make. This mini cheesecake recipe is about to become your go-to Thanksgiving and holiday dessert. It’s super simple to make and if you’re new to making cheesecakes, this bite-sized recipe is a great place to start.

Recipe Ingredients
This pumpkin cheesecake recipe calls for a few important ingredients, and most of them are probably already in your pantry or fridge. Be sure to scroll to the recipe card at the bottom of the article to get the exact quantities.
- Graham cracker crust – I include my recipe for an easy graham cracker crust made from crushed up graham crackers (see below). You can also make this recipe with an Oreo crust, or gingersnap cookie crust if you prefer.
- Pumpkin puree – Be sure to buy unsweetened and unflavored pumpkin puree, rather than pumpkin pie filling.
- Eggs
- Dark brown sugar – The caramel flavor of dark brown sugar goes perfectly with pumpkin.
- Heavy cream
- Vanilla extract – Make sure to use 100% pure vanilla extract, with no artificial flavors.
- Granulated sugar
- Cornstarch
- Spices – Ground cinnamon, nutmeg, and ginger. Alternatively, you can use pumpkin pie spice in place of the individual spices.
- Cream cheese – Make sure that the cream cheese is at room temperature before you start.
- Whipped cream – You can buy pre-whipped cream if you want, but whipping it yourself makes for a much more delicious topping. See the recipe card for details.
Can You Use Graham Cracker Crumbs Instead of Whole Graham Crackers For the Crust?
You absolutely can use graham cracker crumbs if you prefer. Just replace the graham crackers in the pumpkin cheesecake bites recipe with 2 ½ cups of graham cracker crumbs, and add a little more if the crust needs it.

How to Make Mini Pumpkin Cheesecake Bites
This is a fun recipe to make, and it’s pretty straightforward.
- Make the crust. Pulse the graham crackers in a food processor until they are a fine texture. Pour them into a bowl, and mix in the sugar. Then add the melted butter, and stir until all the crumbs are moist.
- Par-bake the crust. Split the crust mixture between two greased baking pans (one 8×8-inch and one 9×9-inch pan). Gently press it into the bottom of each pan. Bake the crusts at 400ºF for about 10 minutes, until they’re a little golden brown on top. Afterward, drop the oven temperature to 325ºF.
- Mix the wet ingredients. Whisk together the pumpkin puree, heavy cream, eggs, vanilla, and dark brown sugar.
- Beat the other ingredients. Using a stand mixer, cream together the cream cheese, granulated sugar, cornstarch, salt, and spices. The mixture should be fluffy.
- Combine the fillings. Pour the pumpkin mixture into the cream cheese mixture, and beat until there are no lumps.
- Bake. Divide the mixture between the two pans and bake at 325ºF for 40 minutes. The cheesecake is done when it starts to pull away from the sides of the pan.
- Cool and cut. Let the pumpkin cheesecake cool entirely, then cut each cheesecake into rounds (or any shape you’d like!).
- Add the topping. Whip the cream in a stand mixer until stiff peaks form. Using a piping bag or a ziplock bag with a frosting tip, pipe the topping onto the mini pumpkin cheesecake bites, then devour!

Tips for Success
Here are some tips for making the perfect pumpkin cheesecake bites every time.
- Use full fat cream cheese. There’s no way around it: cheesecake is significantly better with full fat cream cheese. You’ll get a stronger cream cheese flavor, and a creamier texture.
- Don’t over bake. Remove the pumpkin cheesecake bites from the oven when they start to pull away from the sides of the pan. They’ll still be jiggly in the middle, but don’t worry! If the cheesecake isn’t jiggly, it’s overcooked.
- Let cook completely. It’s tempting to eat these cheesecakes straight out of the oven, but let them cool entirely before eating them. That allows the filling to set, and also ensures that the whipped cream topping won’t melt.
Can These Pumpkin Cheesecake Bites Be Made in a Muffin Tin?
Sure! If you’d rather make these pumpkin cheesecakes in a muffin tin, you can do so easily. You’ll want to bake the crust for a shorter amount of time (keep an eye on their color), and the filling will only take about 15 minutes to bake.
The upside of using muffin tins is that you don’t have to cut the cheesecakes into bites. The downside is that they’re a lot easier to overcook this way. For another easy way to bake cheesecake, try these pumpkin cheesecake bars.

How to Store Mini Pumpkin Cheesecakes
- Fridge. Keep these mini pumpkin cheesecakes stored airtight for up to 3 days in the fridge.
- Freezer. They’ll keep for up to 2 months in the freezer. For best results, freeze the cheesecakes without the whipped cream topping. Thaw them in the fridge and finish off the mini cheesecake bites before it’s time to serve.
More Pumpkin Recipes to Try
If you liked these mini pumpkin cheesecake bites (and I know you did!) then be sure to check out these other pumpkin recipes of mine.
- Pumpkin spice latte cupcakes
- Pumpkin roll
- Pumpkin cream cheese muffins
- Pumpkin pie smoothie
- Pumpkin spice snickerdoodles

Mini Pumpkin Cheesecake Bites
Ingredients
For the graham cracker crust
- 18 graham crackers, about 2 sleeves
- ¼ cup (50 g) granulated sugar
- 1 stick unsalted butter, melted
For the filling
- 15 ounce (425 g) pumpkin puree
- 3 eggs
- ½ cup (110 g) dark brown sugar
- 2 tablespoon heavy cream
- 1 teaspoon vanilla extract
- 20 ounce (567 g) cream cheese, room temperature
- ½ cup (100 g) granulated sugar
- 1 tablespoon cornstarch
- 1 ½ teaspoon cinnamon
- ½ teaspoon nutmeg
- ½ teaspoon ginger
- ½ teaspoon salt
For the whipped topping
- 1 cup (237 ml) heavy whipping cream
Instructions
- Preheat oven to 400 °F (204 °C). Lightly spray a 8×8 baking pan and a 9×9 baking pan with cooking spray. Set aside.
- In a food processor, put the graham crackers in and pulse until finely ground. Pour out into a large bowl. Pour the granulated sugar on top and stir, then add the melted butter and stir until well incorporated and all the crumbs are moist.18 graham crackers, 1/4 cup (50 g) granulated sugar, 1 stick unsalted butter
- Divide the graham cracker mixture evenly amongst the 8×8 baking pan and the 9×9 baking pan. Press gently to the bottoms of the pans. Bake for 10 minutes, until slightly golden brown on top. Remove, set aside, and turn oven temperature down to 325 °F (163 °C)
- In a large bowl, whisk together pumpkin puree, eggs, brown sugar, heavy cream, and vanilla extract.15 ounce (425 g) pumpkin puree, 3 eggs, 1/2 cup (110 g) dark brown sugar, 2 tablespoon heavy cream, 1 teaspoon vanilla extract
- In the bowl of a stand mixer, cream together cream cheese, granulated sugar, cornstarch, cinnamon, nutmeg, ginger, and salt until light and fluffy. Gently pour in the pumpkin mixture and beat until well incorporated. Continue beating until no lumps remain.20 ounce (567 g) cream cheese, 1/2 cup (100 g) granulated sugar, 1 tablespoon cornstarch, 1 1/2 teaspoon cinnamon, 1/2 teaspoon nutmeg, 1/2 teaspoon ginger, 1/2 teaspoon salt
- Divide the batter evenly amongst the 8×8 pan and the 9×9 pan.
- Bake for 40 minutes, or until the cheesecake starts to pull away from the sides.
- Let cool completely before cutting into circles with a biscuit cutter or similar, about 2½ inches in diameter.
- While the cheesecake cools, make your whipped cream.
- In a bowl of a stand mixer with the whisk attachment, whisk 1 cup of heavy cream until stiff peaks form. To pipe onto the individual circles, fill a piping bag with a large pastry tip (I used a closed star tip).1 cup (237 ml) heavy whipping cream
Notes
Nutrition
Photography by Eat Love Eats


Love all your recipes but this one leaves a bit to be desired in my opinion. Why make it in square pans and cut out circles? #1, Leaves a lot of leftovers. #2, No mention of what size circles to cut. #3, Seems like extra work/time to accomplish. If cutting circles, removing them from the pan looks to be difficult (keeping them in one piece). The recipe itself is a winner but the method and written instructions (to me) fail. I will make these for this Thanksgiving but will make them in serving-size pans (muffin or other small circular pans). Appreciate the recipe!
What type of pan to make these small pumpkin cheesecake bites?
i used a mini muffin tin
I did this but used my mini-cupcake pan, lined with wrappers and pressed the graham cracker crust in with a cocktail muddler end, filled with filling and baked for 15 minutes. They were PERFECTLY sized, cooked and the wrappers came right off easily for presenting on tray. It made 36 mini-bites and had no waste!
I had something similar to these and never saw them ever again, so I finally had a chance to put this together and the delightful aroma is filling the house. I know it will be good because the rest of the family and I couldn’t stop eating the batter..ha. Can’t wait to finish.
I think I’m going to make these – what do you think of me cooking them on Wednesday (storing the pans in the fridge over night) and then cutting them out Thursday morning? Also, about how many did they make? Thanks.
You can definitely do that. In the recipe, it says it makes 16-18 cheesecake bites! Enjoy!
Thanks so much. Sorry I didn’t look closely enough to find the servings amount. My husband will be thrilled!
No problem! Enjoy! :)
Hey! The vanilla extract isn’t included in the instructions, so I accidentally left it out, just a heads up.
Thanks for the heads up! :) I’ve made the edit!
I made these for Thanksgiving and they tasted wonderful. I did do a little addition of some gingersnap cookies mixed into the crust. I was wondering if you ever have had problems cutting through the crust or getting the cheesecakes out of the cutter. Most of mine did not look very professional. Do you have any tips?
Hi Amy! I’m so glad you made these for Thanksgiving! I just pressed gently on the top of the cheesecake and it would fall out of the cutter and onto the plate. You could also dip the cutter in flour before cutting and that should help it slide it out more easily.