This post may contain affiliate links. Please read our disclosure policy.
This honey soy chicken is as equally flavorful as its sister, holy yum chicken, but just a different flavor profile! Asian and saucy!

I came up with honey soy chicken because of the overwhelming response to my holy yum chicken.
Quick and easy chicken dinners that can be made in one casserole dish seems to be the way to your hearts!
I know it is for me because when you’re tired after a long day, the last thing you want to do is make an elaborate dinner.
Have no fear that just because this is an easy chicken recipe that it is lacking in flavor.
It is just the opposite!
Honey soy chicken has so much flavor!
The ingredients in honey soy chicken give it a lot of flavor. Here’s the run down of the ingredient list:
- Honey
- Soy sauce
- Sesame oil
- Garlic
- Ginger

How do you get it all nicely browned on top?
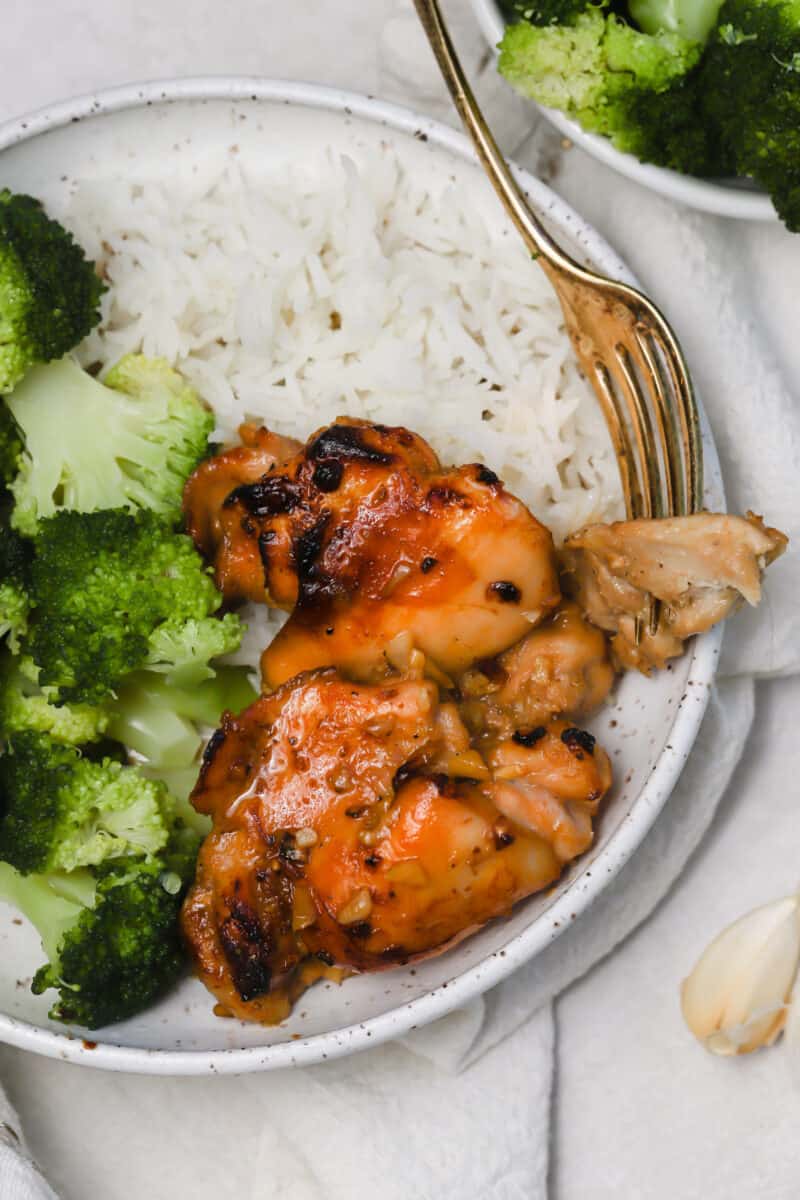
I stick the entire casserole dish under the broiler to get the nice golden brown color you see in the photos.
This step is absolutely optional and you don’t have to. I obviously did it because I think it looks better and I love a crispy caramelized edge on my chicken thighs.
Can you use chicken breasts?
You can but I love using dark meat/chicken thighs.
They are foolproof and don’t dry out like chicken breasts do.
They also tend to take less time to cook.

Is the sauce supposed to be thick?
No. I keep getting comments from people saying their sauce is runny.
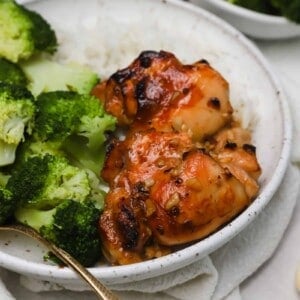
It’s supposed to be runny like you can see in the photos.
There’s nothing in the ingredients that would make the sauce thick.
I did mention that soy sauce and honey are both sticky ingredients when cooked at high heat but that doesn’t mean the sauce is going to be thick.
I’m saying that the excess sauce that may be on the sides of your baking dish or foil will be sticky/crusty. Hope that clarifies things!
Can you make this in the slow cooker?
I mean, I guess you could but it already whips up so fast in the oven that I feel putting it in the slow cooker would be a bit of an overkill.
Here are some tips to help you make this honey soy chicken recipe a success!
- If you don’t follow directions and want to improvise, that is definitely ok! But please do not come back to yell at me for a failed dish. The instructions are laid out completely above because I have tested it myself and it works the way it’s written above.
- If you do not use the right equipment it will likely not turn out either. 8×8″ pan means 8×8″ pan. 2 layers of foil means 2 layers of foil. Why? 8×8″ pan will keep the sauce together and compact and won’t cause it to spread out over a large surface area. If you put it in a larger pan, it will spread, therefore, causing the sauce to get cooked off and you’ll end up with dry chicken and little to no sauce. Double layering the foil insulates the sauces and the chicken, it’ll keep the sauce from burning on the scalding hot pan.
- Yes, it really is cooked at 425 degrees. I’m not going to lie to you. Yes, it’s high but it also works (proof: above pictures!)
- If you’re using (thin cut) chicken breasts, reduce cooking time by 10-15 minutes or you’ll end up with dry chicken.
More chicken recipe ideas:
- Holy yum chicken
- Roasted chicken with olives and tomatoes
- Fig and rosemary glazed skillet chicken
- Coconut harissa curry braised chicken
- Chicken with 40 cloves of garlic
Honey Soy Chicken
Equipment
Ingredients
- 3 tablespoons vegetable oil
- 3 tablespoons low sodium soy sauce
- 1 teaspoon sesame oil
- 5 tablespoons honey
- 4 cloves of garlic, minced
- ½ teaspoon ground ginger
- ½ teaspoon ground black pepper
- 1 ½ – 2 pounds (1 ⅗ kg) boneless skinless chicken thighs, (most of the fat cut and discarded)
Instructions
- Preheat oven to 425 °F (218 °C). Line a 8×8" oven-proof pan with 2 layers of tin foil. I HIGHLY advise using foil in this dish because soy sauce & honey are STICKY and tend to adhere heavily on glass dishes when cooked at high temperatures. Unless you want to be scrubbing forever, use the foil!
- In small bowl, whisk together vegetable oil, soy sauce, sesame oil, honey, garlic, ground ginger, and pepper.3 tablespoons vegetable oil, 3 tablespoons low sodium soy sauce, 1 teaspoon sesame oil, 5 tablespoons honey, 4 cloves of garlic, 1/2 teaspoon ground ginger, 1/2 teaspoon ground black pepper
- Place the chicken thighs in the foil layered pan then pour the mixture on top of it. Turn the chicken around in the sauce to make sure it gets all coated.1 1/2 – 2 pounds (1 ⅗ kg) boneless skinless chicken thighs
- Bake, uncovered, for 40 minutes, checking occasionally to make sure the tops are not browning too quickly. If they are, cover with foil and resume baking until chicken is done.
- Remove from oven and let chicken sit for 5 minutes then transfer to a plate. Do NOT discard the liquid.
- Immediately after plating chicken, pour sauce over top of chicken. It’s delicious so you want all the sauce you can get!
- Serve with white or brown rice and some steamed veggies.
Notes
Nutrition
Photography by Ari Laing


So so good! Just finished eating this for dinner with my bf and picky younger sister :) we all loved it. Followed ALL directions and turned out awesome :) Used chicken breast that we seasoned and sliced up thin.
Awesome, Brittney! I’m so glad y’all loved it!!
Awesome chicken recipe..I followed all directions until the end. At the end after removing the chicken I thickened the sauce and poured back over the chicken, I will tell you it is finger licking good!!!!
Absolutely some of the best chicken ever..I followed the directions exactly until I got to the end and before I poured the sauce back over the chicken I thickened it and omg it is amazing. The only problem with this recipe is that it should be doubled,
So glad you enjoyed this, Brenda!
I made this tonight and it was very good! Two questions: My chicken did not get the rich, caramelized brown color yours appear to have. Was your dark color largely a result of optimal lighting? Second, should the sauce thicken a lot while cooking? Mine didn’t, so I found I had to keep spooning sauce over my chicken while I ate to really enjoy the flavor (certainly not a big problem, just want the recipe perfected for next time!).
Hi Molly! I’m glad you liked this! My dark color was from me sticking it under the broiler for a couple minutes after it finished cooking to char it a little. The sauce doesn’t thicken while cooking – mine was pretty saucey as you can tell in the first picture with the sauce all over the bottom of the plate!
Hi! I just wanted to say that I made this delish recipe tonight and my whole family loved it. My kids who usually fight with me to eat there meals DEVOURED it and my husband wanted more lol. Thanks for the great recipe!
That’s awesome Maegan!! So glad your entire family loved the dish!
I made this last night and it was great! Mine didn’t look quite as good as your’s (new time I may stick it under the broiler to get a nice color) but the sauce was delicious. So glad I used to two layers of aluminum foil because the sauce definitely went through the first layer.
I’m glad you enjoyed this, Tiffany! Thanks for letting me know!
Found this recipe through Pinterest today, and cooked it tonight. It is awesome!! Pinned and shared with my Facebook friends.
So glad you enjoyed this, Keri! Thanks so much for sharing with your friends!
I would like to make this for 15 people, but do not have 4 8×8 pans. What would you suggest?
Hi Darcy, sorry I didn’t get back to you yesterday! I would suggest you just using a larger pan. A 4-quart or 5-quart glass baking dish would work. It’s ok if the chicken is a little bit stacked on top of each other. It’ll still cook all the way through. Enjoy!
I would like to make this for 15 people. I do not have 4 8×8 pans though. What do you suggest?
Do you think it would turn out as well in a crockpot if left on low?
Hi Brindar, I’m not sure, I’ve never done it before so I can’t guarantee the results, but I don’t see why it wouldn’t work.