This post may contain affiliate links. Please read our disclosure policy.
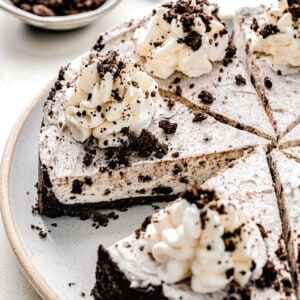
This no-bake Oreo pie is to die for. It’s made up of a just-crunchy-enough Oreo crust filled with a wonderfully creamy, Oreo-laden filling. The pie is topped off with homemade whipped cream and a smattering of crushed Oreos. Yum, yum, yum!

Oreos hold a special place in my heart. They are delicious on their own but boy oh boy do they make a wonderful theme for a dessert. I decided to use these widely adored sandwich cookies to inspire this no bake Oreo pie. It’s gloriously simple to put together and only requires 20 minutes of active time in the kitchen.
Oreo pie might just climb to the top of your dessert favorites list. From the crust to the filling to the Oreos crumbled on top it is completely loaded with Oreo flavor. Just imagine sinking your teach into a layer of fluffy whipped cream followed by a smooth, creamy, slightly tangy cream cheese and Oreo filling. If that’s not enough to get your mouth watering, keep in mind that the aforementioned filling is sitting on top of a buttery Oreo crust that is just out of this world.

Why You’ll Love This Oreo Pie
I cannot wait for you to try this creamy, Oreo-filled pie. It really is one of my favorites. Here are a couple of reasons why.
- No-bake. You don’t even have to turn on your oven to make this decadent cookies and cream pie. Just assemble the dessert, pop it in the freezer for an hour, slice, and serve.
- Packed with Oreos. If you’re an Oreo lover like me, you will appreciate this dessert because every centimeter is bursting with Oreo flavor. From the crust to the filling to the Oreo crumbled on top, it’s Oreos, Oreos, Oreos all the way.
- Unbeatable texture. The filling for this Oreo pie is so smooth and creamy and perfectly light and fluffy all at the same time. It glides over your tongue like an Oreo-filled cloud. Pair that with the slight crunch of the Oreo crust and, gosh, you’ve reached dessert heaven.

Recipe Ingredients
Here is a list of ingredients needed to make this glorious cookies and cream pie. Don’t forget to scroll to the recipe card below for exact measurements.
Crust
- Oreos – I am definitely partial to original Oreos but you could easily use double-stuffed oreos or even vanilla or mint Oreos if you want to.
- Unsalted butter – The butter must be melted before you mix it in with the Oreos.
Filling
- Heavy whipping cream
- Cream cheese – The cream cheese should be softened to room temperature. It will mix more smoothly and easily with the other ingredients. See the “Tips for Success” section below to find out why this is important.
- Powdered sugar
- Vanilla extract
- Crushed Oreos – Again, I like original Oreos but feel free to pick your favorite.
Topping
- Heavy whipping cream
- Powdered sugar
- Vanilla extract
- Crushed Oreos
How to Make No Bake Oreo Pie
It will only take you 20 minutes of active kitchen time to throw this Oreo-packed dessert together. Here’s how to do it. Be sure to scroll to the recipe card below for more detailed instructions.


- Make the crust. Pulse the Oreos and the melted butter in a food processor until fine crumb form. Press the mixture into the bottom and sides of a 9-inch springform pan. Place it in the freezer.


- Make the filling. Beat the heavy cream on medium speed until stiff peaks form. In a separate bowl, beat the cream cheese, powdered sugar, and vanilla extract until smooth and creamy. Gently fold in the whipped cream followed by the crushed Oreos.
- Fill the crust. Spread the filling evenly over the chilled crust. Freeze for 1 hour.
- Make the whipped cream topping. Beat the remaining heavy cream on medium speed until soft peaks form. Add in the powdered sugar and vanilla extract and continue mixing until stiff peaks form.
- Decorate. Pipe the whipped cream on top of the pie and garnish with crushed oreos.
Tips for Success
Before you dive headfirst into making this decadent pie, I want to leave you with a few tips and tricks that will help you achieve the best results possible.
- Room temperature cream cheese. Before making the filling, allow the cream cheese to come to room temperature. If it is too cold, it will not mix smoothly with the other ingredients. This can lead to over-mixing (see my next point) and/or a potentially lumpy filling.
- Don’t over-mix. Over-mixing the filling will knock the volume out of the whipped cream, leaving you with a dense pie. So, when folding the whipped cream and crushed Oreos into the filling, do so gently and only until everything is just incorporated.
- Use a springform pan. If you don’t have one already, it’s worth the investment. A springform pan allows you to release the sides of the pan from the pie when it is done. This allows you to avoid the almost certain mess that would result from attempting to remove the pie from a standard baking pan.
- Be patient. No one wants to cut into a pie to find a sloshy mess. To avoid this, have patience and allow the pie to set in the freezer for at least 1 hour or in the refrigerator for 2-4 hours.
- Make clean slices. When slicing your Oreo pie, use a large, sharp knife and keep a bowl of hot water close by. Before the first slice and before every slice after that, dip the knife in the hot water for a few seconds and dry it with a clean dish towel. This will give you the cleanest slices possible.

Can This Cookies and Cream Pie Be Prepared in Advance?
Yes, it can! You can make the filling and the crust a couple of days ahead of time. Press the crust into the sides of the springform pan and wrap the whole thing in plastic wrap. Seal the filling in a separate airtight container. Store both components in the refrigerator for up to 3 days. When you are ready to serve, spread the filling evenly over the chilled crust, make the whipped cream, and decorate the pie with whipped cream swirls and Oreo crumbles.
Serving Suggestions
This no bake Oreo pie is next to perfect on its own but adding some ice cream or a drizzle of chocolate sauce makes it absolutely irresistible. Here are some of my favorite ways to enjoy it.
- Ice cream. Grab a pint of your favorite vanilla ice cream or whip up a batch of No Churn Oreo Fudge Ice Cream, Cookies and Cream Ice Cream, Espresso Chocolate Chip Ice Cream, or even Coffee Coconut Milk Ice Cream. Scoop it on top of a slice of this Oreo pie and send your taste buds to heaven.
- Sauce. Drizzle the chocolate ganache from this Cheesecake Bar recipe over the top of the pie or make caramel sauce (salted or regular).
- A glass of cold milk. Wash this rich dessert down with a glass of cold milk.

How to Store Leftovers
Leftovers? No problem. Wrap the pie in a double layer of plastic wrap and place it in the refrigerator. I suggest using toothpicks to prop the plastic away from the whipped cream so as not to smoosh it. Alternatively, you can slice the cake and arrange the slices in a single layer in an airtight container. In either case, store the pie in the refrigerator for up to 4 days.
Can I Freeze No Bake Oreo Pie?
You can! Pop the dessert in the freezer for a couple of hours to firm up before wrapping it in a double layer of plastic wrap. If you already sliced the pie, arrange the slices in a single layer in an airtight container. Sliced or whole, store the pie in the freezer for up to 3 months. Allow it to thaw in the refrigerator before serving.
More Oreo Desserts
If you love Oreos as much as I do, you might find yourself wondering how you can incorporate them into as many desserts as possible. This Oreo pie is a great place to start but don’t stop there. Check out these other amazing Oreo desserts from yours truly.
- Fried Oreos
- Oreo Cheesecake Bars
- Oreo Cheesecake Cookies
- Cookies and Cream Milkshake
- No Churn Oreo Fudge Ice Cream
- Cookies and Cream Ice Cream
Oreo Pie
Ingredients
Crust:
- 24 Oreos, about 2 cups
- 5 tablespoons (70 g) unsalted butter, melted
Filling:
- 1 cup (237 ml) heavy whipping cream
- 8 ounces (227 g) cream cheese, softened to room temperature
- ¾ cup (90 g) powdered sugar
- 1 teaspoon vanilla extract
- 1 cup (160 g) crushed Oreos
Topping:
- ½ cup (118 ml) heavy whipping cream
- 2 tablespoons powdered sugar
- ½ teaspoon vanilla extract
- 4-5 Oreos, crushed for sprinkling on top
Instructions
- Add oreos and melted butter to a food processor. Pulse until a fine crumb forms.24 Oreos, 5 tablespoons (70 g) unsalted butter
- Press the crust mixture into the bottom and sides of a 9-inch springform pan.
- Place in freezer while you make the filling.
- Add heavy cream to a stand mixer fitted with the whisk attachment. Beat on medium speed for 3-4 minutes, or until stiff peaks form. Remove from the bowl and set aside.1 cup (237 ml) heavy whipping cream
- Add cream cheese, powdered sugar and vanilla extract to the bowl of a stand mixer fitted with the paddle attachment. Beat on medium speed until smooth and creamy, about 1 minute. Using a spatula, gently fold in the whipped cream until well incorporated.8 ounces (227 g) cream cheese, 3/4 cup (90 g) powdered sugar, 1 teaspoon vanilla extract
- Gently fold in the crushed oreos. Spread filling evenly over the chilled crust. Return to freezer for 1 hour or refrigerate for 2-4 hours, until set.1 cup (160 g) crushed Oreos
- Add remaining heavy cream to a stand mixer fitted with the whisk attachment. Beat on medium speed for 2-3 minutes, or until soft peaks form. Add in the powdered sugar and vanilla extract and continue mixing until stiff peaks form.1/2 cup (118 ml) heavy whipping cream, 2 tablespoons powdered sugar, 1/2 teaspoon vanilla extract
- Pipe whipped cream on top of the pie. Garnish with crushed oreos. Serve chilled.4-5 Oreos